
Want to learn how to use Snipping Tool? Press Windows + Shift + S, pick a mode like Rectangle or Full screen, and drag over what you want. Your screenshot is copied and saved to the Screenshots folder automatically. That’s the fastest way, and it’s built into Windows for free.
Below I’ll show you how to use Snipping Tool step by step, every mode and shortcut, how to add a delay, how to edit and save your snips, and how to record your screen.
[ADD PERSONAL EXPERIENCE: one line about what you use Snipping Tool for most, like work notes, tutorials or receipts.]
Table of Contents
What Is Snipping Tool?
Snipping Tool is the free screenshot app built into Windows 10 and Windows 11. It lets you capture your whole screen or just part of it, draw on the image, and save or share it. On Windows 11, it can also record short videos of your screen.
How to Use Snipping Tool: 7 Easy Steps
These steps follow Microsoft’s official Snipping Tool guide.
1. Open Snipping Tool
Click Start, type Snipping Tool and open it. Or skip the app and press Windows + Shift + S to start a snip straight away. Knowing this shortcut is the biggest time saver when you learn how to use Snipping Tool.
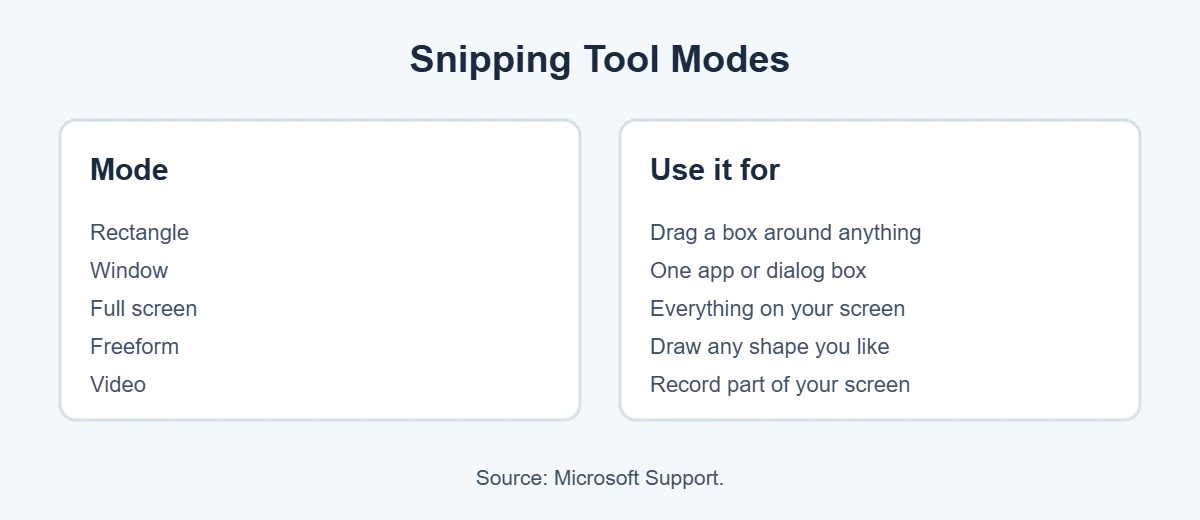
2. Pick a snip mode
Choose how you want to capture. You can switch modes with Alt + M.
3. Add a delay (optional)
Need to capture a drop-down menu? In the app, set a delay of 1 to 5 seconds, or press Alt + D. Start the snip, then open the menu before the timer ends.
4. Take the snip
Click New (or use the shortcut), then drag over the area, click a window, or let it grab the full screen. The snip opens in the Snipping Tool window.
5. Mark it up
Use the pen and highlighter to circle or underline things. There’s also an eraser and a ruler for straight lines. This is perfect for showing someone exactly where to click.
6. Save or copy it
Microsoft says snips are saved automatically to the Screenshots folder. To save an extra copy, click Save as or press Ctrl + S. To paste it into an email or chat, press Ctrl + C, then Ctrl + V.
7. Take another snip
Press Alt + N to start a new snip in the same mode. That’s handy when you need a set of screenshots.
Snipping Tool Shortcuts Cheat Sheet
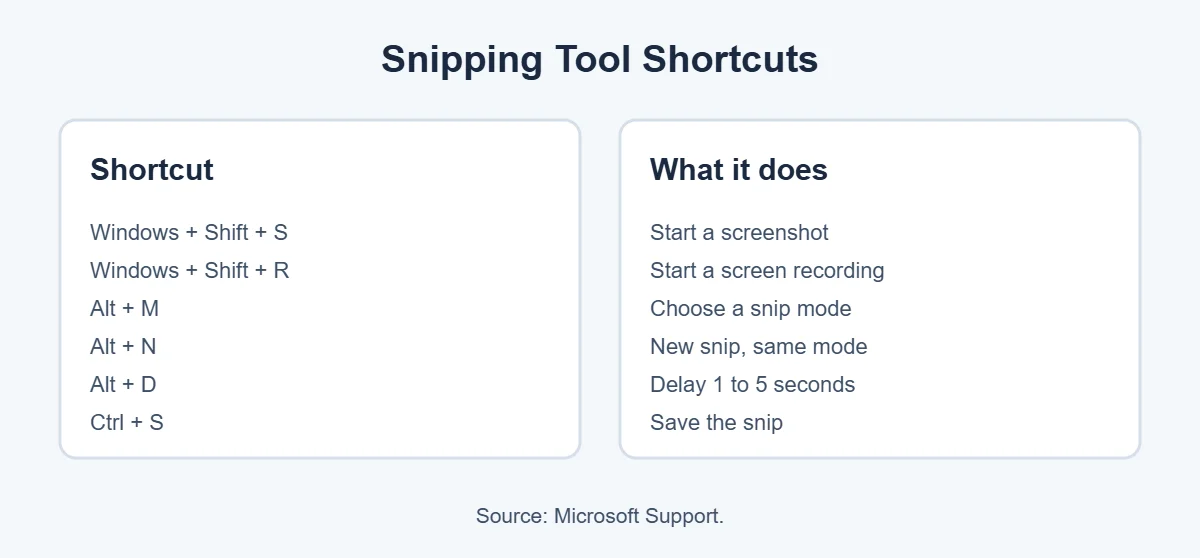
Once you know how to use Snipping Tool, these shortcuts make it even faster.
| Shortcut | What it does |
|---|---|
| Windows + Shift + S | Start a screenshot |
| Windows + Shift + R | Start a screen recording |
| Alt + M | Choose a snip mode |
| Alt + N | New snip in the same mode |
| Alt + D | Delay the capture 1 to 5 seconds |
| Ctrl + C / Ctrl + S | Copy / save the snip |
How to Record Your Screen With Snipping Tool
Learning how to use Snipping Tool for video is just as easy. On Windows 11, you can record your screen too. According to Microsoft Support:
- Open Snipping Tool and select the Video option.
- Select New and drag over the area you want to record.
- Select Start, then Stop when you’re done.
Shortcut: Windows + Shift + R. On Windows 10, Microsoft suggests using Clipchamp for screen recording instead.
Where Does Snipping Tool Save Screenshots?
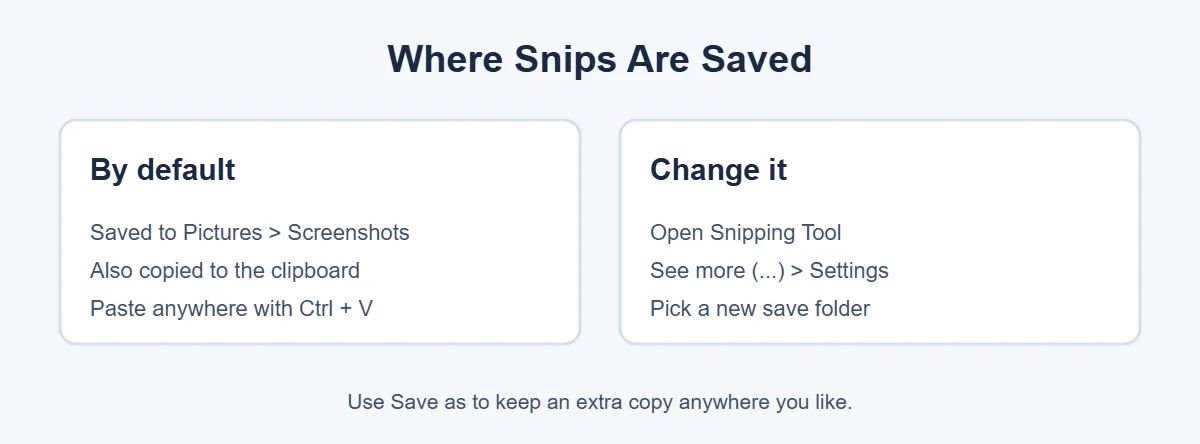
Part of knowing how to use Snipping Tool is knowing where your files go. By default, snips go to Pictures, then Screenshots. To change the folder, open Snipping Tool, click See more (the three dots), then Settings.
Snipping Tool Not Working? Quick Fixes
- Restart your computer.
- Install the latest Windows updates.
- Open Snipping Tool from Start if the shortcut does nothing.
- Go to Settings, Apps, Installed apps, find Snipping Tool, open Advanced options and choose Repair or Reset.
If your PC is old and even simple tools like this feel slow, it may be time to upgrade. Here’s why laptops cost more than desktops, and what to do with your old laptop.
Frequently Asked Questions
What is the shortcut for Snipping Tool?
Press Windows + Shift + S. Your screen dims and a small toolbar appears so you can choose rectangle, window, full screen or freeform. For a screen recording, Microsoft lists Windows + Shift + R. Both open the Snipping Tool overlay without opening the full app first.
Where does Snipping Tool save screenshots?
Microsoft says snips are saved automatically to the Screenshots folder, which is inside Pictures. They’re also copied to your clipboard. To change the folder, open Snipping Tool, select See more, then Settings. Use Save as to keep an extra copy anywhere.
How do I take a delayed screenshot with Snipping Tool?
Open the Snipping Tool app and choose a delay of 1 to 5 seconds, or press Alt + D. Start the snip, then open the menu or pop-up you want to capture before the timer runs out. This is handy for drop-down menus that close when you click.
Can Snipping Tool record video?
Yes, on Windows 11. Open Snipping Tool, select the video option, then New, drag over the area and press Start. You can also press Windows + Shift + R. On Windows 10, Microsoft suggests using Clipchamp to record your screen instead.
Why is Snipping Tool not working?
Restart your PC first, then install the latest Windows updates, since Snipping Tool is updated through Windows and the Microsoft Store. If the shortcut does nothing, open Snipping Tool from the Start menu. A reset under Settings, Apps, Installed apps can also help.
Is Snipping Tool free?
Yes. Snipping Tool comes built into Windows 10 and Windows 11 at no extra cost. You don’t need to download anything else to take screenshots, add notes or save them.
The Bottom Line
Now you know how to use Snipping Tool: press Windows + Shift + S, pick a mode, capture, mark it up and save. Use Alt + D for a delay and Windows + Shift + R to record your screen.
It’s free, built into Windows and quicker than any other screenshot app. Practice once, and how to use Snipping Tool will become second nature.
{“@context”:”https://schema.org”,”@type”:”FAQPage”,”mainEntity”:[{“@type”:”Question”,”name”:”What is the shortcut for Snipping Tool?”,”acceptedAnswer”:{“@type”:”Answer”,”text”:”Press Windows + Shift + S. Your screen dims and a small toolbar appears so you can choose rectangle, window, full screen or freeform. For a screen recording, Microsoft lists Windows + Shift + R. Both open the Snipping Tool overlay without opening the full app first.”}},{“@type”:”Question”,”name”:”Where does Snipping Tool save screenshots?”,”acceptedAnswer”:{“@type”:”Answer”,”text”:”Microsoft says snips are saved automatically to the Screenshots folder, which is inside Pictures. They’re also copied to your clipboard. To change the folder, open Snipping Tool, select See more, then Settings. Use Save as to keep an extra copy anywhere.”}},{“@type”:”Question”,”name”:”How do I take a delayed screenshot with Snipping Tool?”,”acceptedAnswer”:{“@type”:”Answer”,”text”:”Open the Snipping Tool app and choose a delay of 1 to 5 seconds, or press Alt + D. Start the snip, then open the menu or pop-up you want to capture before the timer runs out. This is handy for drop-down menus that close when you click.”}},{“@type”:”Question”,”name”:”Can Snipping Tool record video?”,”acceptedAnswer”:{“@type”:”Answer”,”text”:”Yes, on Windows 11. Open Snipping Tool, select the video option, then New, drag over the area and press Start. You can also press Windows + Shift + R. On Windows 10, Microsoft suggests using Clipchamp to record your screen instead.”}},{“@type”:”Question”,”name”:”Why is Snipping Tool not working?”,”acceptedAnswer”:{“@type”:”Answer”,”text”:”Restart your PC first, then install the latest Windows updates, since Snipping Tool is updated through Windows and the Microsoft Store. If the shortcut does nothing, open Snipping Tool from the Start menu. A reset under Settings, Apps, Installed apps can also help.”}},{“@type”:”Question”,”name”:”Is Snipping Tool free?”,”acceptedAnswer”:{“@type”:”Answer”,”text”:”Yes. Snipping Tool comes built into Windows 10 and Windows 11 at no extra cost. You don’t need to download anything else to take screenshots, add notes or save them.”}}]}